SCI Testers and Remote Communication:
Using HyperTerminal
Introduction
Programmable industrial equipment has long been a staple for automation in manufacturing environments. The capability to remotely program and run electrical safety testing equipment is a more recent development. Since fully automated electrical safety testing systems can be cost prohibitive, SCI has released a series of electrical safety testing instruments with PC communication capability at a cost effective price. The SCI 290 series, 4320 and 6330 cover the full range of electrical safety testing as well as having an optional USB or RS-232 communication port for PC programming.
Users new to programming SCI safety testers may have difficulty getting started or troubleshooting communication with an instrument. A simple solution to assist users with basic communication or troubleshooting communication problems is using the HyperTerminal program. HyperTerminal is a program that can be used for simple communication with test instrumentation via a serial port. It allows user to send basic ASCII commands to SCI test units and receive queries to ensure proper functionality. This paper will outline setting up a HyperTerminal session as well as communicating with SCI test equipment.
Setting Up a HyperTerminal Session
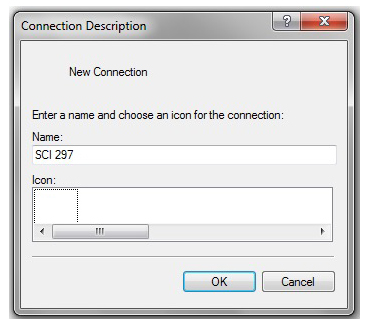
HyperTerminal is one of many programs such as Putty, Tera term and others alike which can be used to send commands and queries to your instrument. While certain programs such as LabVIEW and Visual Basic’s has gained popularity, for the purpose of this app note a simple HyperTerminal session will suffice. Once the program starts, the user will be prompted for a new connection description as shown figure 1.


Figure 1: New Connection
To initiate a new connection, the user must enter a connection name. For the example in figure 1, the name SCI 297 was used. The choice of the icon will not affect connection settings. Once completed, the user finishes the connection description by hitting the “OK” button. This will then take the user to the communication port connection window (figure 2).


Figure 2: Communication Port Connection
In this window, the user will setup the serial port that will be used for communication to the SCI tester via the RS-232 cable. In this example communication port 66 is being used (COM66). The communication port number may vary depending on the number of communication ports on the PC or if USB to RS-232 converters are in use. Hitting the down arrow in the “Connect using:” field will display all available communication ports on the PC. Once the proper communication port has been selected the user must hit the “OK” button to proceed.
Now that the communication port has been specified, the user will setup the communication port properties (figure 3).


Figure 3: Communication Port Properties
There are five fields that must be set in order for the SCI tester to properly communicate with the PC: baud rate (or bits per second), data bits, parity, stop bits and flow control. SCI units require the following communication port settings for null modem communication (figure 3):
- 9600 Bits per second
- 8 Data bits
- No Parity
- 1 Stop bit
- No Flow control
The baud rate, or bits per second parameter, and number of data bits informs the HyperTerminal program how quickly information is being sent between the SCI tester and the PC as well as how many bits will be contained in each message. The stop bit acts as an end of command flag informing HyperTerminal that a command has completed. Since the unit communicates with a null modem cable, it does not support XON/XOFF protocol or any type of hardware handshaking which is why the flow control is set to “None”. To set the communication port properties, hit the “Apply” button and then hit “OK”. If all settings were properly initiated the HyperTerminal session should be connected to the SCI tester. This can be viewed at the bottom left hand corner of the HyperTerminal window (should state “connected” as shown in figure 4).


Figure 4: Connected HyperTerminal Session
Although the SCI tester is now connected to the HyperTerminal session, the user still needs to alter the session properties in order to have the ability to type and execute the tester commands. To set the ASCII properties, hit “File” and scroll down to the “Properties” selection. Once the properties window pop up appears hit the “Settings” tab (figure 5).


Figure 5: Session Properties Window
Next, hit the “ASCII Setup…” button near the bottom of the window. This will allow the user to set how the user can send and receive ASCII information during the HyperTerminal session. The optimal setting mode for simply command sending and troubleshooting is to enable ASCII sending. To do this, enable the two boxes in the ASCII Sending section. These boxes are labeled “Send Line ends with line feeds” and “Echo Typed Characters locally” (figure 6). After completing the ASCII setup, click OK to return to the main HyperTerminal screen. HyperTerminal is now ready to receive typed ASCII commands.


Figure 6: ASCII Setup
Sending Commands and Queries
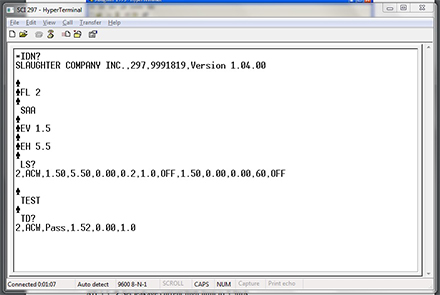
All SCI test instruments with RS-232 or USB capability can be programmed remotely by sending simple ASCII commands through the HyperTerminal session window. After setting up proper communication with a HyperTerminal session, the first step to ensure a valid connection is to query the instrument. The “*IDN?” command queries the SCI test for unit identification. When queried, the tester will respond with the following syntax: Company, Model Number, Serial Number, and Firmware Revision. Example communication with a SCI 297 is illustrated in figure 7. In this example, the company is SCI, the model number is a 297 followed by 0 for the serial number and a 1.04 firmware version. Receiving the unit identification information ensures the user is not only properly communicating with the HyperTerminal session but also that the RS-232 card or USB port on the instrument is functioning within specification.
The following example outlines setting up an AC hipot test, running this test and then querying the unit for the test results. Commands and queries are displayed in figure 7 through the HyperTerminal session. The commands and syntax for this example are as follows (command -> description of command function):


Figure 7: Example SCI 297 Communication
Commands and Descriptions
FL 2 -> Load Memory location 2
LS? -> List test parameters
SAA 0 ->Set the hipot as an AC test
EV 1.5 -> Set hipot voltage to 1.5kV
EH 5.5 -> Set leakage current high limit to 5.5mA
EDW 3.0 -> Set dwell time to 3.0
TEST -> Start AC hipot test
TD? -> Query for results
The TD? command is used to query information from the instrument. It will respond with the information that is on the LCD display at the instant of the query. In this case, the query was made after completion of the test so the response gives the test results. The syntax for this query and example display is as follows:
Memory Number, Test Type-Test Status, Voltage, Leakage Current, Test Time
| Displayed Message | Query Response |
| PASS | 2, ACW, Pass, 1.50, 0.00, 1.0 |
For more information regarding the instrument’s command set, please refer to the BUS REMOTE INTERFACE USB/RS-232 section of any compatible SCI model.
Conclusion
Setting up a HyperTerminal session with a SCI safety tester offers a simple method for communicating with the instrument. Whether the user would like to familiarize them with the command set, get example queries or troubleshoot potential communication problems, HyperTerminal communication with SCI instruments offer this unique flexibility at low cost.


